Per my usual modus operandi, this post includes way too many photos of the same thing, over and over, and will probably be boring for anybody other than myself. But, as usual, my blog, my rules. So without any further ado....
Kitchen & Living Room Before:

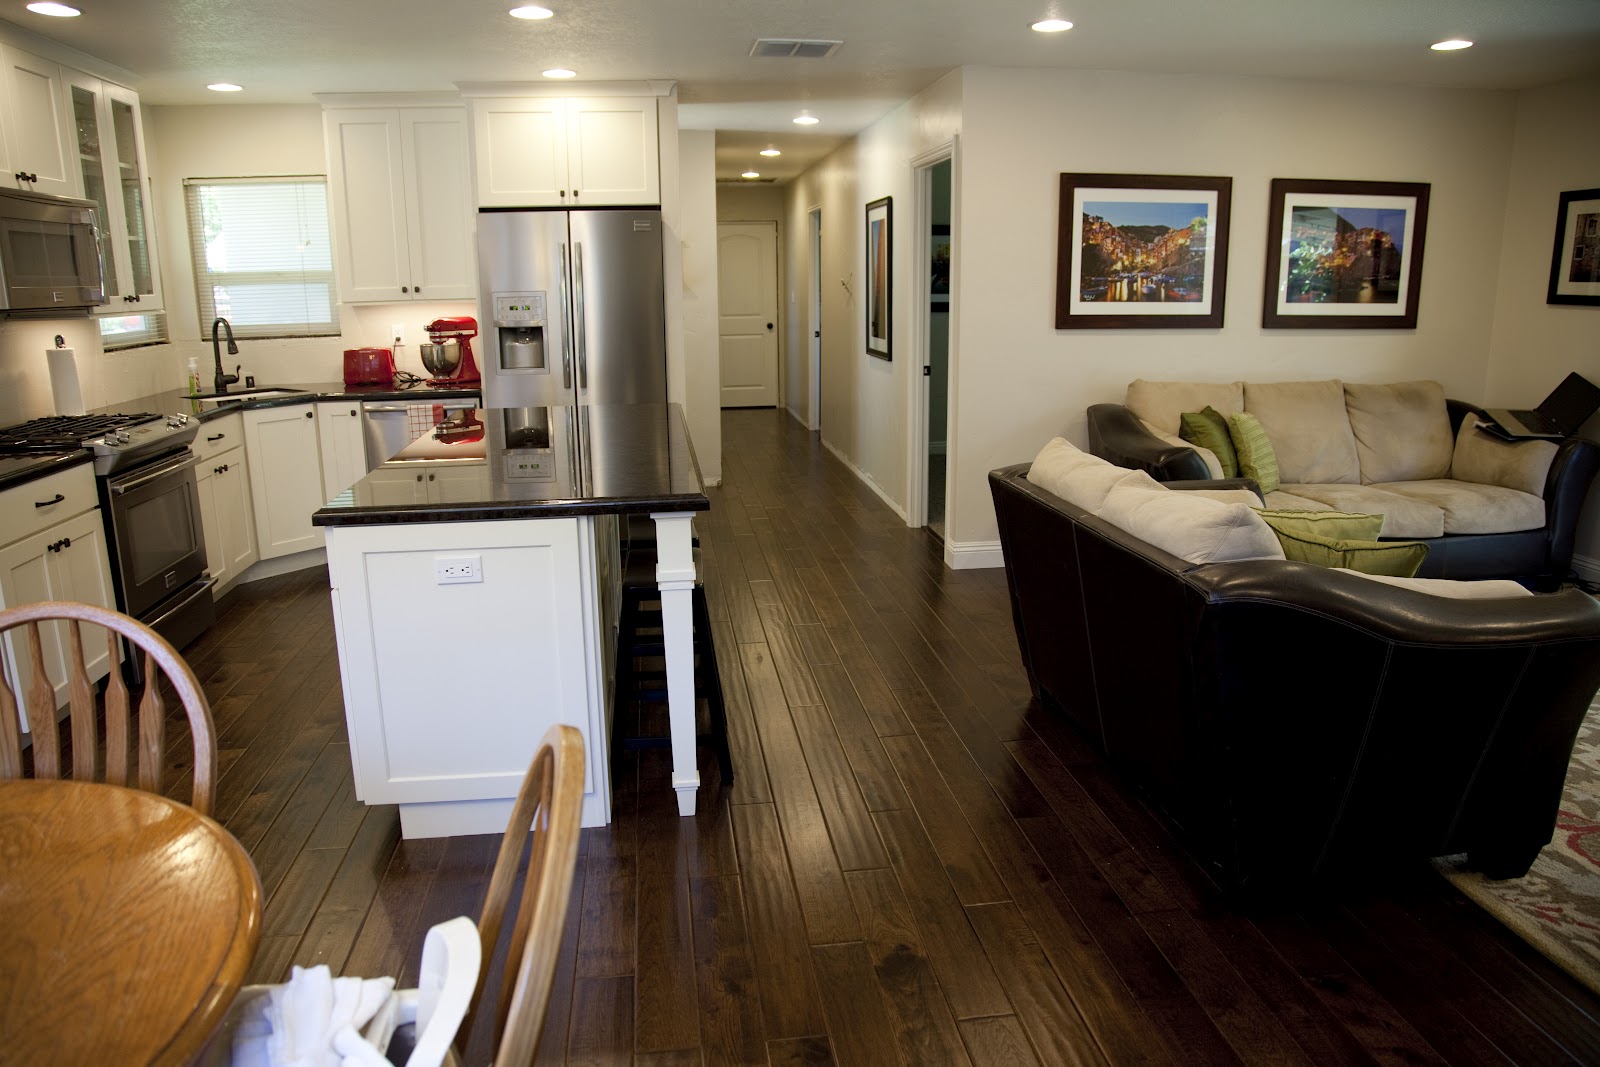
Kitchen & Living Room After:

Kitchen Before:

Kitchen After:

If you look too closely at the "after" pictures, you will notice that there is actually quite a bit of work that still needs to be done - there is no casing or trim around the windows, baseboard is missing through most of the house still, we need to purchase window blinds, the dishwasher is still not working properly (not Paul's fault from install - it came with a faulty control panel which is on order for replacement - grrrrr....), we haven't even started looking at backsplash tiles (let alone purchase and install), etc. Some other things we hope to do is print off pictures to put in frames for a picture wall behind the kitchen table (I just have paper the size of the frames I have already purchased from Ikea up on that wall right now with stick figure drawings representing images I am thinking of using), possibly get a rug for under the kitchen table (?), buy a chair to go in the corner of the living room where the television used to be (which has now been mounted to the wall over the fireplace). So the fun never ends, right?
Some things that went into the project that you might not realize by looking at the photos but that Paul spent hours and hours and hours on include running all sorts of wiring to mount the t.v. so that the wires would be inside the wall rather than running out where they would be visible, installing all new doors on the side of the kitchen and into the garage, reworking the lighting situation (previously there were only two lights in the kitchen area with a ceiling fan light fixture over the table area - Paul researched how to properly light a space based on square footage and room requirements, like where a light over a sink is supposed to be placed so that you don't cast a shadow over what you are working on - my husband is brilliant, right?), patching tons of cracks in the ceiling, installing under-cabinet lighting, etc. Seriously, Paul has been working so hard on this remodel. I am so grateful to have such a handy, resourceful, smart husband who can figure out stuff like how to install doors, fix plumbing under the sink, and wire for under cabinet lighting. Plus he looks so handsome and rugged and strong and knowledgeable doing this kind of stuff. Clara and I are two very lucky girls.
We also owe a huge thanks to the friends and family who helped us with projects like texturing walls, ripping out old flooring, installing new flooring, and hefting in the heavy appliances. We were only totally kitchenless for a little over 5 weeks, which isn't really too bad when you think about how much work had to happen to do the remodel, and it would have taken us Paul a lot longer otherwise, especially if his brother Dave hadn't agreed to spend some of his vacation time between finishing up his first year at BYU's MBA program and starting his summer internship to come out and help us with demolition, texturing and electrical projects. And we are also so grateful for the friends who had us over for dinner during the remodel, which saved me from another crockpot meal. I am very happy to no longer have to wash dishes in Clara's baby bathtub (even if I am still having to wash them in a sink rather than the dishwasher) and to be able to boil pasta and bake cookies roast brussel sprouts.
Oh, wait, what was that? Did I just hear you grumbling that I better stop talking and get on with more pictures? You got it.
Notice the new door to the left of the photo below - it has a window in it that brings in SO much more natural light than we used to have in the dining space and it has made a huge difference. Also, notice that the fridge has been moved - it used to be beside the kitchen door and the oven and stove used to be where the fridge is now. The legs on the island were my idea and the glass-front cabinet doors were Paul's idea.


I found the chandelier on clearance at Lamps Plus for only $149. Not bad, right?

The hardwood floor is the hickory engineered wood in a "pecan cider" finish that we mentioned in a previous post (so congrats to everyone who selected that option as their preference over the walnut option, even though we loved them both). Incidentally, if you click on that link, you will see the computer drawings of our kitchen plans that we developed with the cabinet person at Lowe's. We went with the Schuler line of cabinets from Lowe's in a "divinity" finish. All of the doors and drawers are soft-close and they are in a kind of modified Shaker-style. Our Lowe's cabinet person, Leah, was wonderful to work with - seriously I kind of love her. She had great suggestions, but more importantly, she listened to my ideas and made them work.


Something I notice in the next photo that nobody else would probably pick up on is that shaft of light illuminating the framed picture in the hallway. We installed a new front door that is 3/4 glass because that space (and the entire hallway for that matter) has always been so dark. The look is completely different now and I love it.
I had to stand on a stool to take this next picture but it shows the new appliances pretty well, I think. They are all the same line from Frigidaire and I don't know how it works but it is a stainless steel that doesn't show fingerprints. I was skeptical when I heard that but it is totally true and they look very nice in person, not just in the photos.

Honestly, my biggest contribution has been on the design side and keeping Clara entertained and safe while Paul has borne the brunt of the physical stuff (although I did help with sanding the texture down). But I also painted the brick fireplace a nice slate gray color instead of the drab greenish-brown that it used to be.


This photo shows the front side of the island pretty well. Paul likes how the granite reflects the artwork in the hallway.

Now, I know this is getting excessive as far as photos go, but I like seeing the details and I know that there are a few friends out there who won't be able to visit any time soon who also care about this stuff, so these are for you Deborah, Ginny and Carrie...
One of the things I love to do at friends' houses is go through their cookbooks. I only stuck my favorite (and let's be honest, prettiest) cookbooks on this shelf in the cabinet. The others are out in the garage. The pitcher is one of our favorite souvenirs from our travels - we brought it back from our time when we lived in Frankfurt, Germany and it is a traditional pitcher used for apfelwein from that region.

These are the pull-out shelves in the island where we are keeping out pots and pans, waffle iron, mixer, etc. To the right (behind the open cabinet door) is a built in recycling/garbage drawer, which was high on my list of "wants" on the design-side of the remodel.

Let's be honest, this is the most important cupboard in the entire kitchen. I love being able to keep all of my baking stuff together in one space. That is oatmeal behind the brownie mix, so at least there is something in this cupboard that is healthy, right?

The fridge is counter-depth but the space is working out well for us. I still don't know how I feel about the freezer drawer, but I don't get in there all that often and I love having the double doors on top for the fridge.

I found these new dishes at TJ Maxx Home Goods (thanks Ginny for the suggestion!) and loved them. They are actually totally different sets, but they go well together, I think. We gave our red dishes that we have had since we got married to Paul's brother and sister-in-law (the one who helped us with the remodel).

This picture does a pretty good job of showing the granite, including the edge detail that we chose. The granite is called "brown antique" or "marron cohiba" and the edging is "ogee squared".

And that is pretty much it for remodel photos. If you want to see it in person, give me a call and we will make dinner for you! For reals, I need excuses to use the new space!
My goodness, that's beautiful. Well done!
ReplyDeleteGORGEOUS. I love, love, love it. Congratulations on being mostly done! And thanks for adding the extra pictures. I read the part where you said it was getting excessive, and I thought, "Ha! Yeah right, bring it on!" Then the next line you said that you were posting more for me (and some other friends too I guess.) You obviously know me well... Anyway, it's totally beautiful. Hopefully we can come visit and see it in person soon!
ReplyDeletep.s. I love the stick drawings in the background behind your table. Pretty please just leave those up, that would be awesome...
ReplyDeleteI love it! It's beautiful, I can't believe you guys did all that! We haven't even finished hanging pictures! And we will take that dinner you're offering... We need to see you guys anyway it's been a while! ;)
ReplyDeleteIt looks AMAZING! Good work you guys! I love the white cabinets with the glass doors. I love the island. Pull out drawers are the best! I'm so glad you liked TJ Maxx Homegoods. I miss the bay area store. I cant wait to visit!
ReplyDeleteOooo, it is all so shiny and new and gorgeous! You guys did an awesome job and I am just a wee bit (okay, maybe a lot) envious. I am especially coveting your pull-out shelves. And thanks for adding those few extra photos, because you are right - I am one of the nosey few who would like to admire every single detail. And speaking of nosey, did you get the Joseph & Joseph chopping board set from Costco? I thought I noticed a blue one in your sink. We have the same set and love them! But seriously, the kitchen is beautiful. Bravo on all your hard work!
ReplyDeletePaul & Amy it's GORGEOUS!!! It looks like something from a Better Homes and Gardens or Southern Living magazine. I'm in love. Such a sucker for dark, dark wood flooring and white cabinets. Seriously beautiful!! Congrats:)
ReplyDeletelooks wonderful. Does Paul want to come and work on my house next:)
ReplyDeleteIt looks beautiful!! Very impressive!!
ReplyDeleteYour remodeling went great! Congratulations to you! The hickory floor looks very good. One thing to always remember with wooden floors is that no matter how tough the finish of the floor is, it will eventually get scratched. The first thing to do when this happens is to focus your attention on the deepest scratches. Fill the deep scratches with floor finish using an artist’s brush, and use the floor finish according to directions with these minor touch ups. You may also want to recoat the floors every five years or so, a flooring contractor can do this for you for as little as 60 cents per sq. ft.
ReplyDeleteNoreen Weigle
There’s a wall that divides your kitchen and your living room before. It’s good that you removed it because it made your house look bigger. You provided the area a lot more space. Overall, your remodeling project turned out magnificently! Um, I got hungry after seeing the food in your fridge, by the way. Haha!
ReplyDeleteWilliam Gulliver